Subfloor Leveling: Why Proper Floor Prep Matters for Your Installation
Skipping subfloor preparation leads to cracking, gaps, and premature wear. Here's why leveling matters and what professional prep looks like.

From what we see on job sites across the US, a beautiful floor is only as good as the concrete beneath it. We know the real work begins the moment you pull up that old carpet. Homeowners usually focus on picking the perfect color or grain pattern.
Our team always reminds clients that the hidden foundation actually determines the lifespan of those new materials. This underlying surface dictates whether a flooring installation lasts for decades or fails within months.
Understanding subfloor leveling: why proper floor prep matters for your installation is a concept you cannot afford to ignore.
We will explain the strict industry standards for flatness. Then, the guide covers common structural issues found in homes and the exact methods contractors use to fix them.
Subfloor Leveling: Why Proper Floor Prep Matters for Your Installation
Every flooring material, including LVP, laminate, hardwood, tile, and carpet, requires a specific level of flatness to perform correctly. We strictly follow the National Wood Flooring Association (NWFA) standards for our projects. The industry baseline allows for a maximum 3/16 inch variation over a 10-foot span. Our crews use laser-guided tools to map these imperfections because guessing simply does not work. Wide-plank hardwood and large-format tiles demand an even tighter tolerance of 1/8 inch over a 10-foot radius.
What Happens When You Skip Prep
Skipping this crucial step leads to predictable failures. We see these specific issues constantly when standard tolerances are ignored. The data shows that cutting corners here directly causes expensive repairs.
| Flooring Material | The “Why It Fails” Detail | Common Warning Signs |
|---|---|---|
| Click-Lock LVP & Laminate | Repetitive flexing stresses the 5mm locking mechanism against the subfloor. | Seams separate into visible gaps, or planks begin to warp and tent over high spots. |
| Large-Format Tile (24x24+) | Rigid tiles cannot bend to conform to bumps, leaving the mortar bed unsupported. | Weight on an unsupported area creates a stress point that eventually fractures or cracks. |
| Solid Hardwood | Nail-down installations over high spots do not seat properly, while dips cause poor adhesive bonds. | Planks rock back and forth, creating hollow spots and loud squeaks. |
| Carpet | While forgiving, severe ridges will telegraph directly through the backing. | Visible humps appear, leading to uneven wear patterns in high-traffic zones. |
Common Subfloor Issues in Arizona Homes
Concrete Slab Unevenness
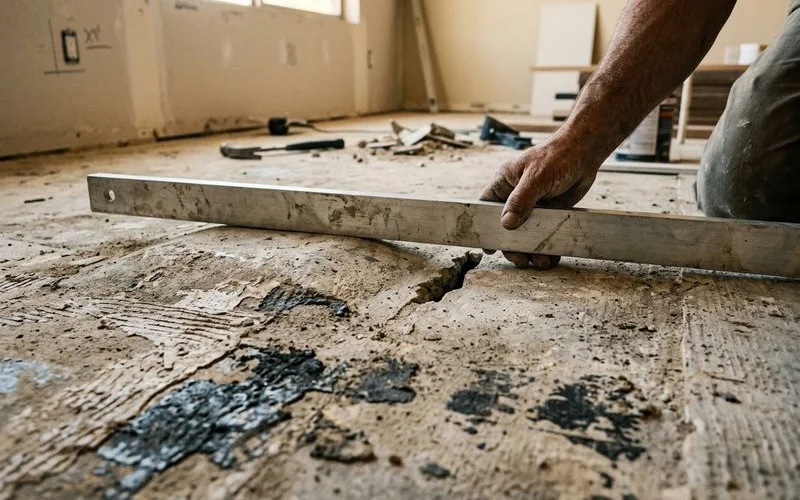
The majority of Maricopa County homes sit on concrete slabs. We frequently deal with issues caused by local soil conditions and settling. Fresh concrete is poured relatively level, but changes happen quickly. Our inspections show that many Arizona slabs exceed the 3/16 inch variation standard, especially in homes over 15 years old. Our uneven floor repair service addresses these exact problems.
Common causes of slab unevenness:
- Slab settling: Gradual dips and slopes occur frequently in newer developments where the desert soil has not fully compacted.
- Plumbing repairs: Trenching into the slab leaves patched areas that are rarely flush with the surrounding surface.
- Expansion joint movement: Shifting concrete creates sharp ridges or dips along control joint lines.
- Curling edges: Slabs can warp upward at the edges during the curing process, creating significant high spots in corners.
Old Adhesive Residue
Removing old vinyl, tile, or carpet rarely leaves a clean slate. We almost always find stubborn adhesive residue left behind on the concrete. This rough surface prevents new flooring from sitting flat and interferes with the chemical bond for glue-down installations. Our crews know that you cannot scrape this material by hand effectively.
Pro Tip: If your home was built before 1980, that black mastic adhesive might contain asbestos. Never try to sand or grind this yourself without paying for a professional abatement test first.
Professional removal requires mechanical grinding with a heavy-duty floor grinder or shot blaster. We utilize 7-inch angle grinders fitted with diamond cup wheels for smaller areas. The dust generated is intense, so HEPA vacuums are absolutely mandatory to keep the workspace safe.
Plywood Subfloor Problems (Raised-Foundation Homes)
Some custom builds and older neighborhoods feature raised foundations with plywood subfloors. We find that these wooden structures present their own set of unique challenges. Plywood delamination is a frequent issue caused by moisture exposure from plumbing leaks under the house. Our technicians also routinely fix height differences between original plywood and replacement sections from previous repairs.
Common plywood issues we encounter include:
- Delamination: Layers of the wood separate due to moisture exposure.
- Joist separation: Fasteners pull away from the joists, creating movement.
- Squeaks: Loose nails rub against the wood under pressure.
- Uneven patching: Previous homeowners patched holes with mismatched wood thickness.
Recent 2025 flooring inspection reports confirm that raised or loose fasteners are the primary cause of subfloor squeaks across the US. We use specific screws rather than nails. This pulls the wood tight against the joist.
Moisture Issues
The dry climate in the Southwest is generally favorable for flooring, but concrete slabs retain surprising amounts of moisture. We always run comprehensive tests before laying a single plank. Freshly poured concrete takes months to fully cure. It can emit excess moisture vapor for up to a full year. Our testing protocol prevents disastrous failures down the road.
Manufacturers previously relied on the calcium chloride test, but industry standards have shifted. We now use the ASTM F2170 Relative Humidity (RH) test with in-situ probes, which measures moisture deep inside the slab rather than just at the surface.
Industry Standard: Most flooring warranties require an RH reading below 75% for glue-down installations or a moisture vapor emission rate below 3 lbs per 1,000 sq ft per 24 hours. Exceeding these limits voids the warranty entirely.
Desert landscaping irrigation near the foundation can drive moisture through the slab. The annual monsoon season from July to September also creates temporary spikes in humidity.
Professional Subfloor Preparation Methods
Concrete Grinding
A commercial floor grinder removes old adhesive, high spots, and surface irregularities from concrete. We rely on machines equipped with diamond-cup wheels to chew through the toughest ridges. The result is a perfectly smooth surface ready for any thin flooring type. Our crews always set up containment barriers. The grinding process creates an enormous amount of airborne dust.
Grinding method details:
- When it is used: Preparing concrete for glue-down installation, flattening high spots, and stripping away old mastic.
- Equipment used: Walk-behind grinders attached to high-capacity HEPA vacuum systems.
- Average Cost: $1.00 to $2.00 per square foot based on recent US estimates.
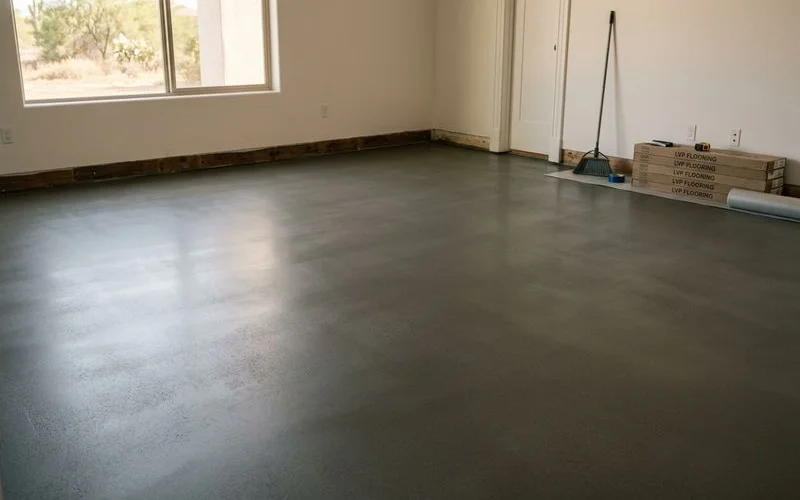
Self-Leveling Compound
Self-leveling compound (SLC) is a highly specialized cement-based liquid poured directly onto the floor. We apply a latex primer first so the dry concrete does not absorb the compound’s moisture too rapidly. Gravity forces the liquid to flow into low areas, settling into a perfectly flat surface. Our team relies on this method for correcting moderate unevenness up to about 1 inch deep.
Ideal use cases for self-leveling compound:
- Filling large dips and “birdbaths” in the concrete.
- Creating a uniformly flat surface across an entire open-concept room.
- Correcting gradual slopes caused by slab settling.
According to 2026 data from Angi, professional SLC application runs between $1.00 and $5.00 per square foot across the US, with most projects averaging around $3.00. For deeper corrections, multiple pours or a preliminary patching step is necessary. It reaches full structural strength in 24 hours.
Plywood Overlay
Severely uneven concrete or rotting wooden subfloors sometimes require a completely new substrate. We install a fresh layer of 1/4-inch or 3/8-inch plywood directly over the existing surface. This creates a flat, stable base. Installers securely glue and screw down the wood to prevent any future movement. Our installers recommend this strategy for several specific scenarios.
When we use plywood overlays:
- Grinding cannot adequately flatten a severely damaged slab.
- Self-leveling compound would need to be poured too thick.
- The existing subfloor material is completely rotted or structurally compromised.
The cost for a new plywood overlay typically ranges from $2.00 to $4.00 per square foot.
Moisture Barrier Installation
When in-situ probe testing reveals elevated moisture levels, a vapor barrier becomes mandatory. We provide several options depending on the flooring material you choose. Floating floors generally require a basic polyethylene film placed over the slab with taped seams. Our glue-down installations need something much stronger.
For maximum protection, we apply a two-part epoxy moisture barrier painted directly onto the concrete. A permanent, high-performance seal forms over the slab. This completely blocks vapor transmission.
Cost comparison for moisture barriers:
- Polyethylene film (6 mil): $0.50 to $1.00 per square foot.
- Epoxy moisture barrier: $2.00 to $4.00 per square foot.
How to Know If Your Subfloor Needs Work
You usually will not know the true condition of your concrete or wood until the old material is removed. We include a comprehensive subfloor assessment in every installation estimate to avoid surprises. Reputable contractors communicate potential additional costs before any heavy work begins. Our initial walkthrough focuses on several visual indicators that suggest hidden problems.
Watch for these early warning signs:
- Existing flooring that looks wavy or shows distinct cracking patterns.
- Doors that stick or drag on the floor, which often indicates significant slab movement.
- Visible cracks in existing tile that follow a straight line, suggesting a large subfloor ridge.
- Squeaking or bouncing when walking across raised-foundation areas.
Once the old floor is removed, we inspect and map the exposed subfloor with a 10-foot straight edge. If unexpected issues appear, we call you with practical options and exact costs before proceeding.
Don’t Skip the Prep
Thorough preparation definitely adds upfront costs to your renovation project. We see the consequences of skipping this phase every single week. The resulting repairs are always more expensive. Premature failures, cracked tiles, and voided warranties far exceed the price of doing the job correctly the first time.
The core lesson of subfloor leveling: why proper floor prep matters for your installation comes down to protecting your investment. Zona Floors includes thorough assessment and preparation in every flooring installation. Schedule your free estimate or call 480-428-5080.

Thomas Inman
Owner, Zona Floors
Thomas Inman founded Zona Floors in 2022 with a mission to bring honest pricing and quality craftsmanship to homeowners across Maricopa County.
Arizona ROC License #336899 · Thumbtack Top Pro 2023–2025
Looking for professional help?
Learn about our Flooring Installation service →